Online Instruction Manual and Tutorial
Using a Digital Camera to Photograph Images on Microfilm
This is the Online Instruction Manual for GSC Associates Digital Microfilm Reader Camera Mount
DCM-1.
This manual also provides a general tutorial on how to take and process images
of microfilm from a microfilm reader using a digital camera. The URL for this file is:
http://www.gscassociates.com/mount_manual.html .
The
GSC Associates Digital Microfilm Reader Camera Mount, DCM-1, is designed to
securely attach your own camera to most microfilm readers to allow you to take images of
consistent high quality from microfilm. It
eliminates the need for microfilm scanning equipment costing thousands of
dollars or using microfilm printers.
The following accessories are recommended for taking microfilm images:
- A digital camera with at least 3 mega-pixels and optical zoom
capabilities. We highly recommend the cameras made by Olympus,
especially the 7.1 mega-pixel C-7070
"Wide Zoom" camera. The example images in this tutorial were
taken using a 3.3 mega-pixel Olympus C3030 Zoom camera with a 3X optical
zoom.
- A remote shutter release cable or a remote control to trigger you camera
to take a picture.
- Two or more high capacity memory cards for your camera. We recommend
Compact Flash/Microdrive and the xD-Picture Card with at least 512 Megabytes of capacity since
each image will require several megabytes of memory for storage. Two cards
are best so that you can continue imaging on one card while another is
being downloaded to your laptop.
- A power supply for your camera, since the LCD display must be turned on
to position the images to be photographed. Operating the LCD display drains
camera batteries very quickly.
- A laptop computer with a USB card reader for the memory card type used by your
camera. You can leave the camera mounted and remove just the memory card
from it to transfer images to your laptop.
- Image processing software (that is included with all higher end digital
cameras).
- A 3/8" wrench for tightening the jam nuts to secure the camera to the
mount.
Attach your camera to the camera mount by threading the threaded rod (1) into
the mounting attachment hole on the bottom of your camera. The threaded rod
should be inserted as far as possible and then backed off to the point where the
camera is pointing in approximately the right direction after mounting. Secure the camera to
the mount using the two jam nuts (2) (see Figure 1). A small wrench (3/8",
not supplied) is useful for securely tightening the nuts.
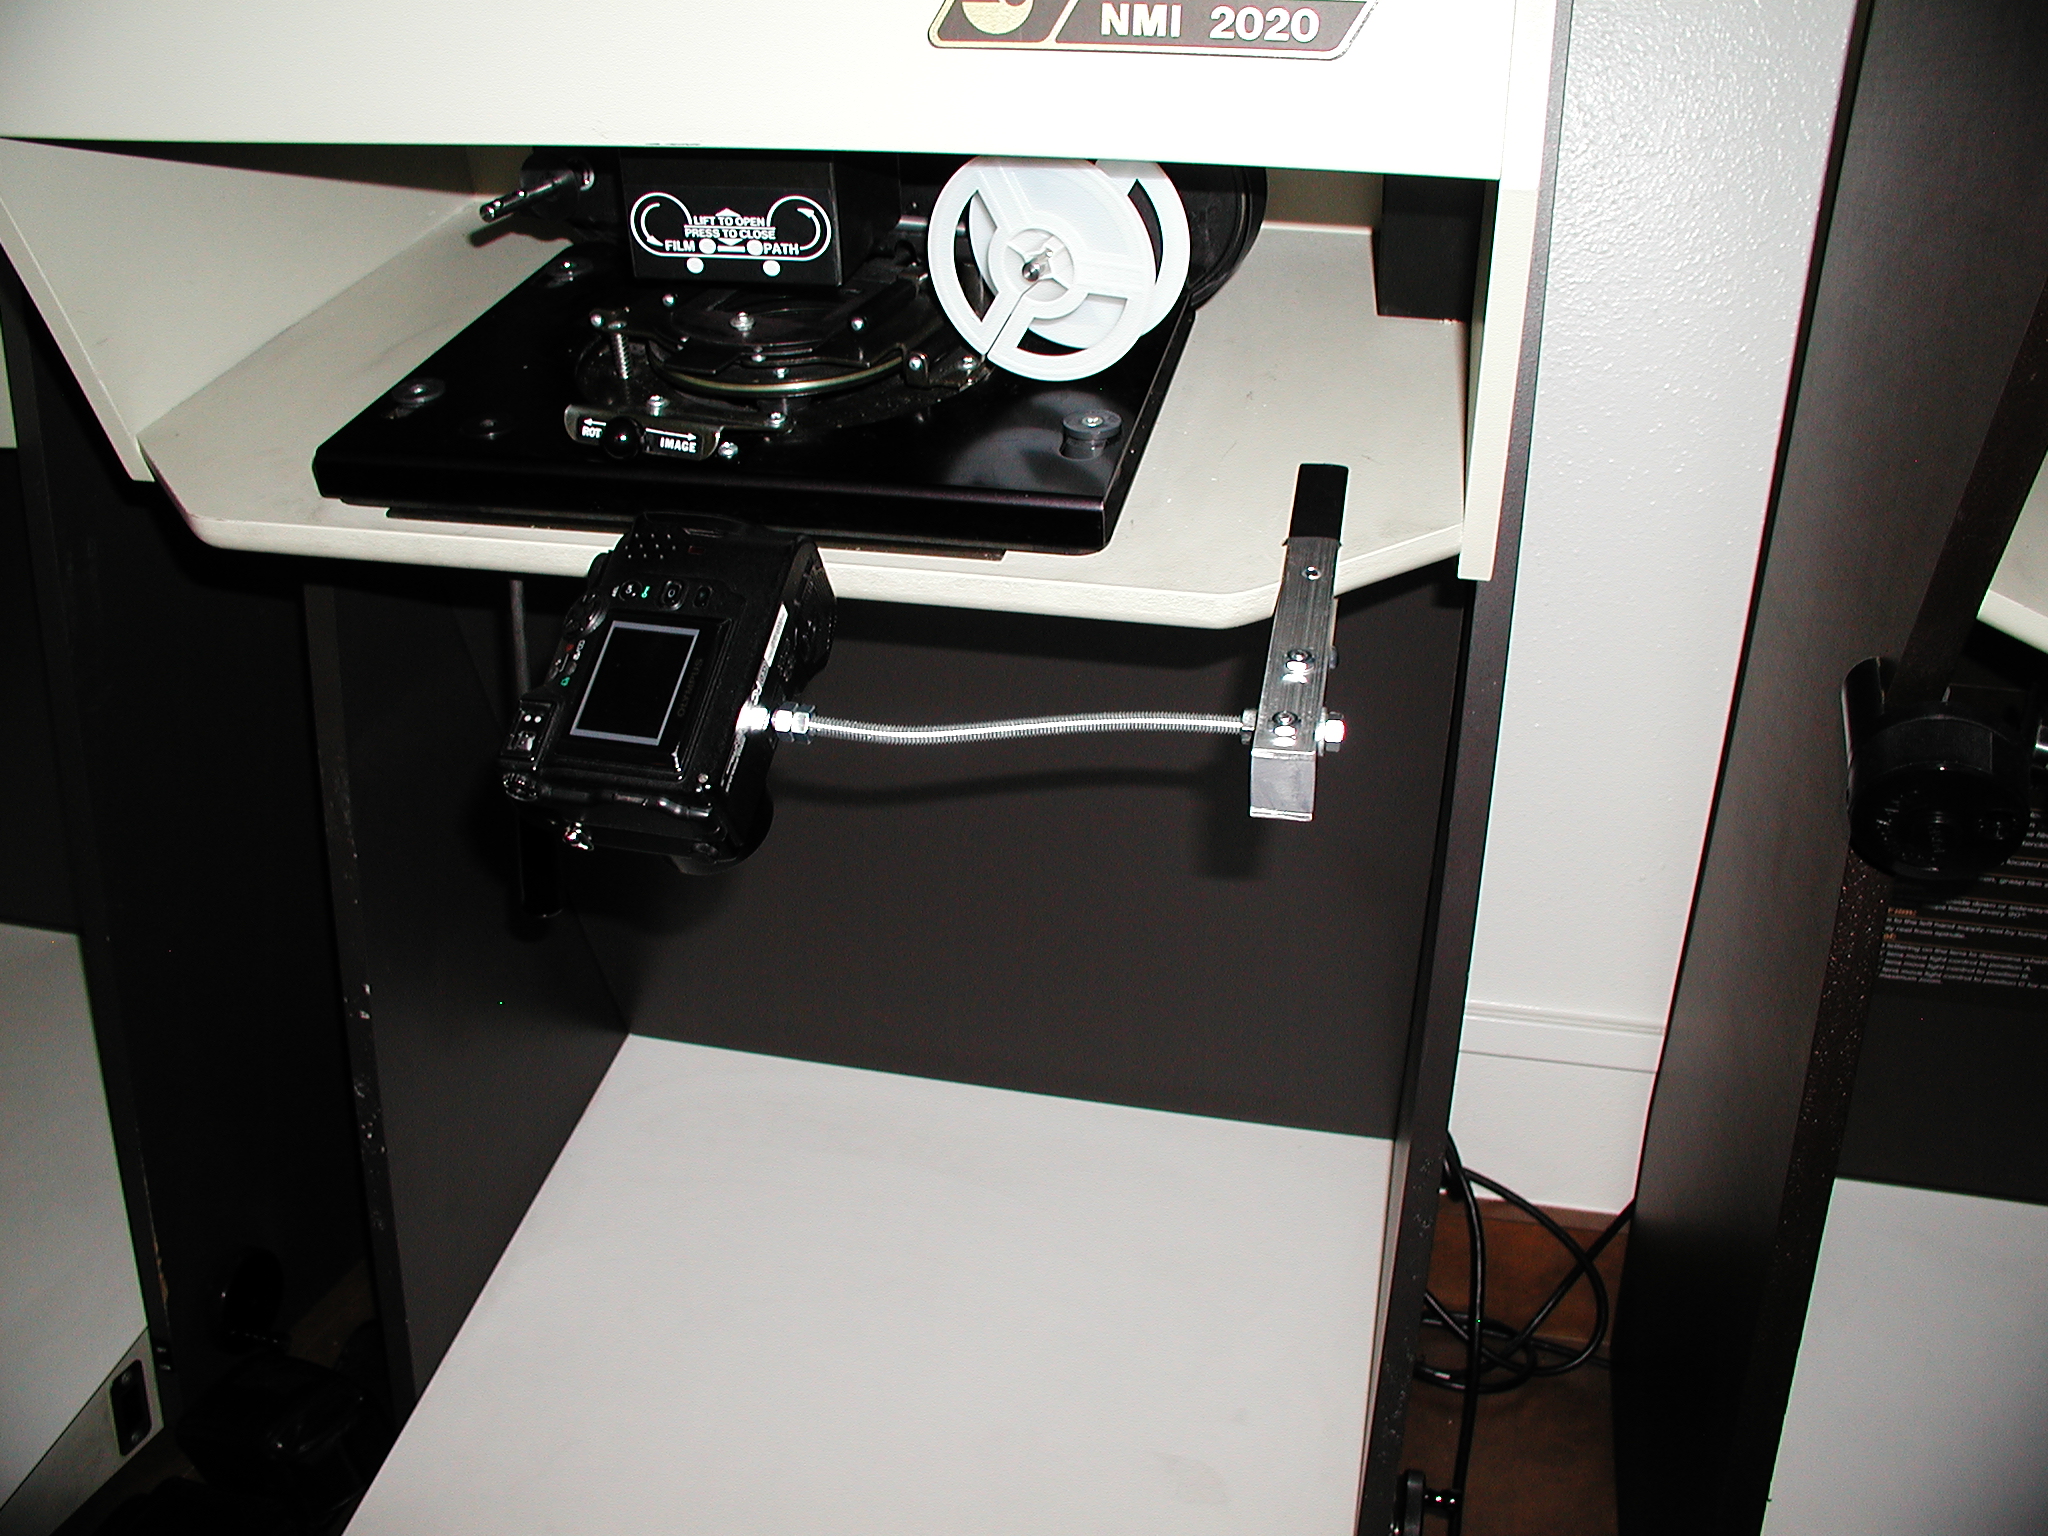
Once the camera is attached to the mount, slide the fork (3) of the camera mount over the shelf on the microfilm reader (see
Figure 2) and secure by tightening the wing screw
(4). Generally you want the camera to be positioned so that it is touching or
almost touching the shelf on the microfilm reader and close to directly in front
of the projection lens on the reader. On some readers, hardware prevents the
camera mount from sliding far enough over so it is directly in front of the
projection lens on the reader. In these cases, just position the images a bit to
one side on the viewing surface of the reader to compensate. Figure
3 shows a different and higher resolution view of the mount and camera in
use.
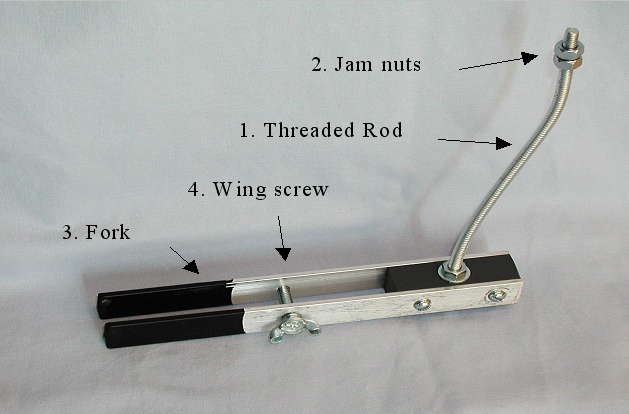
Figure 1. The DCM-1 Digital Microfilm Camera Mount
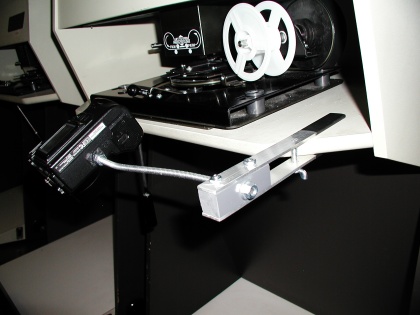
Figure 2. The DCM-1 in use on a microfilm reader
The following steps are typical as you prepare to take images with your
mounted camera. In some cases it is best to make some of these settings before
the camera is mounted. This depends on the location of the controls on your
camera.
- Turn the camera on. It is preferable to use a power supply cable to power
the camera from AC power rather than battery power.
- Boot up your laptop and attach the card reader so it is ready to accept
and store images.
- Mount the roll of microfilm and position and focus a frame of the film on
the viewing surface of the microfilm reader.
- Turn the flash on the camera off. Images on microfilm readers are created by
light from a projector bulb that passes through the microfilm and then the
projection lens to strike the white viewing surface from which it is reflected
to your eye. The light from a camera flash also reflects off that same viewing
surface and back to the camera, resulting in a good picture of the
"blank" white viewing
surface but none of the desired microfilm image.
- Set the camera to aperture priority and push it several F steps positive
so that a wider area of the image appears in focus. This is important
because the camera is not directly aligned with the axis of the projection
lens, so some parts of the image are further away from the camera lens than
others. Some experimentation will be necessary to determine the best setting
for your camera.
- Set the camera to its finest ISO image quality (lower ISO numbers mean
less grainy images; ISO 100 quality or better is supported by most digital
cameras).
- Set the camera to its highest JPEG compressed image quality (often called
"super high quality") with the largest possible number of pixels.
It is not necessary to use an uncompressed mode (often called TIFF mode) to
take acceptable quality pictures of images from microfilm.
- Set the camera to auto focus and auto adjust shutter speed. In rare cases
a microfilm image will either not contain a sufficient amount of "vertical"
lines or will not be bright enough for a camera to auto focus. In these rare
cases you will need to manually focus the camera, probably shooting and
checking a series of test images before proceeding.
- Set the camera to a "black and white" or "gray-scale"
mode. If you fail to do this, the images may appear "brown". This
can be corrected later by changing them into gray scale images in your
image editing program.
- Set the camera to "tungsten light" illumination source.
- Turn on the LCD display on the camera and observe the image in the display
while adjusting:
- the optical zoom on the camera;
- the optical zoom (if any) on the microfilm reader;
- the position of the microfilm carriage to "pan" the image on the
viewing surface;
- the position of the microfilm carriage to "rotate" the image on
the viewing surface so that its longer dimension matches the longer
dimension of the camera's frame; Note: the image need not be upright
in the camera frame since its orientation can easily be adjusted using most
standard image processing software;
- the microfilm position between the roll and take up reel - this is best
done by manually moving the reels, not by using a reader's hand crank;
- the rotation of the camera on the mount (loosening and re-tightening the
jam nuts as required);
- continue adjusting until the desired image comes close as possible to
filling the LCD viewer in one dimension (rotating the microfilm on the
reader if necessary so that the longest dimension of the image matches the
longest dimension of the camera's imaging area).
Do not attempt to use the camera view finder to position images because the
camera is so close to the viewing surface that considerable parallax error results
from using view finder.
Using a remote shutter release or a remote control, trigger the shutter on
the camera to take the picture. Do not attempt to take the picture by manually
pressing the shutter release. This will cause the camera to shake far too much
and will result in a blurry image. If you have an IR remote control, it can
normally be aimed at the reader viewing surface where it will bounce off and
reach the sensor on the front of the camera.
Because long exposure times - often several seconds in length - are
necessary, it is essential that the camera and the microfilm reader remain
absolutely still while the camera shutter is open. In public microfilm reading
rooms, it may be necessary to wait until your neighbors are not shaking your
reader excessively before you take your photos.
If you are taking photos for the first time, you will want to download and
inspect a few test images before proceeding to insure that all elements of the
system are correctly set up. Click on the thumbnail in Figure
4 to see an example "raw" image that is 2048 X 1536 pixels and 1.7
megabytes in size, taken on a Dukane MDP Microfilm Reader using an Olympus C
3030 camera.
Figure 4. Example raw image (Click
on the thumbnail image above to see the full size picture.)
It is possible to take a large number of images very rapidly using your
camera and the DCM-1 mount. An experienced user can take an images at a rate of
about 15 seconds each. This is far faster than the imaging times of even
the fastest and most expensive microfilm scanners.
The following post processing steps are typical for converting raw images
into high quality images for use in research and publications.
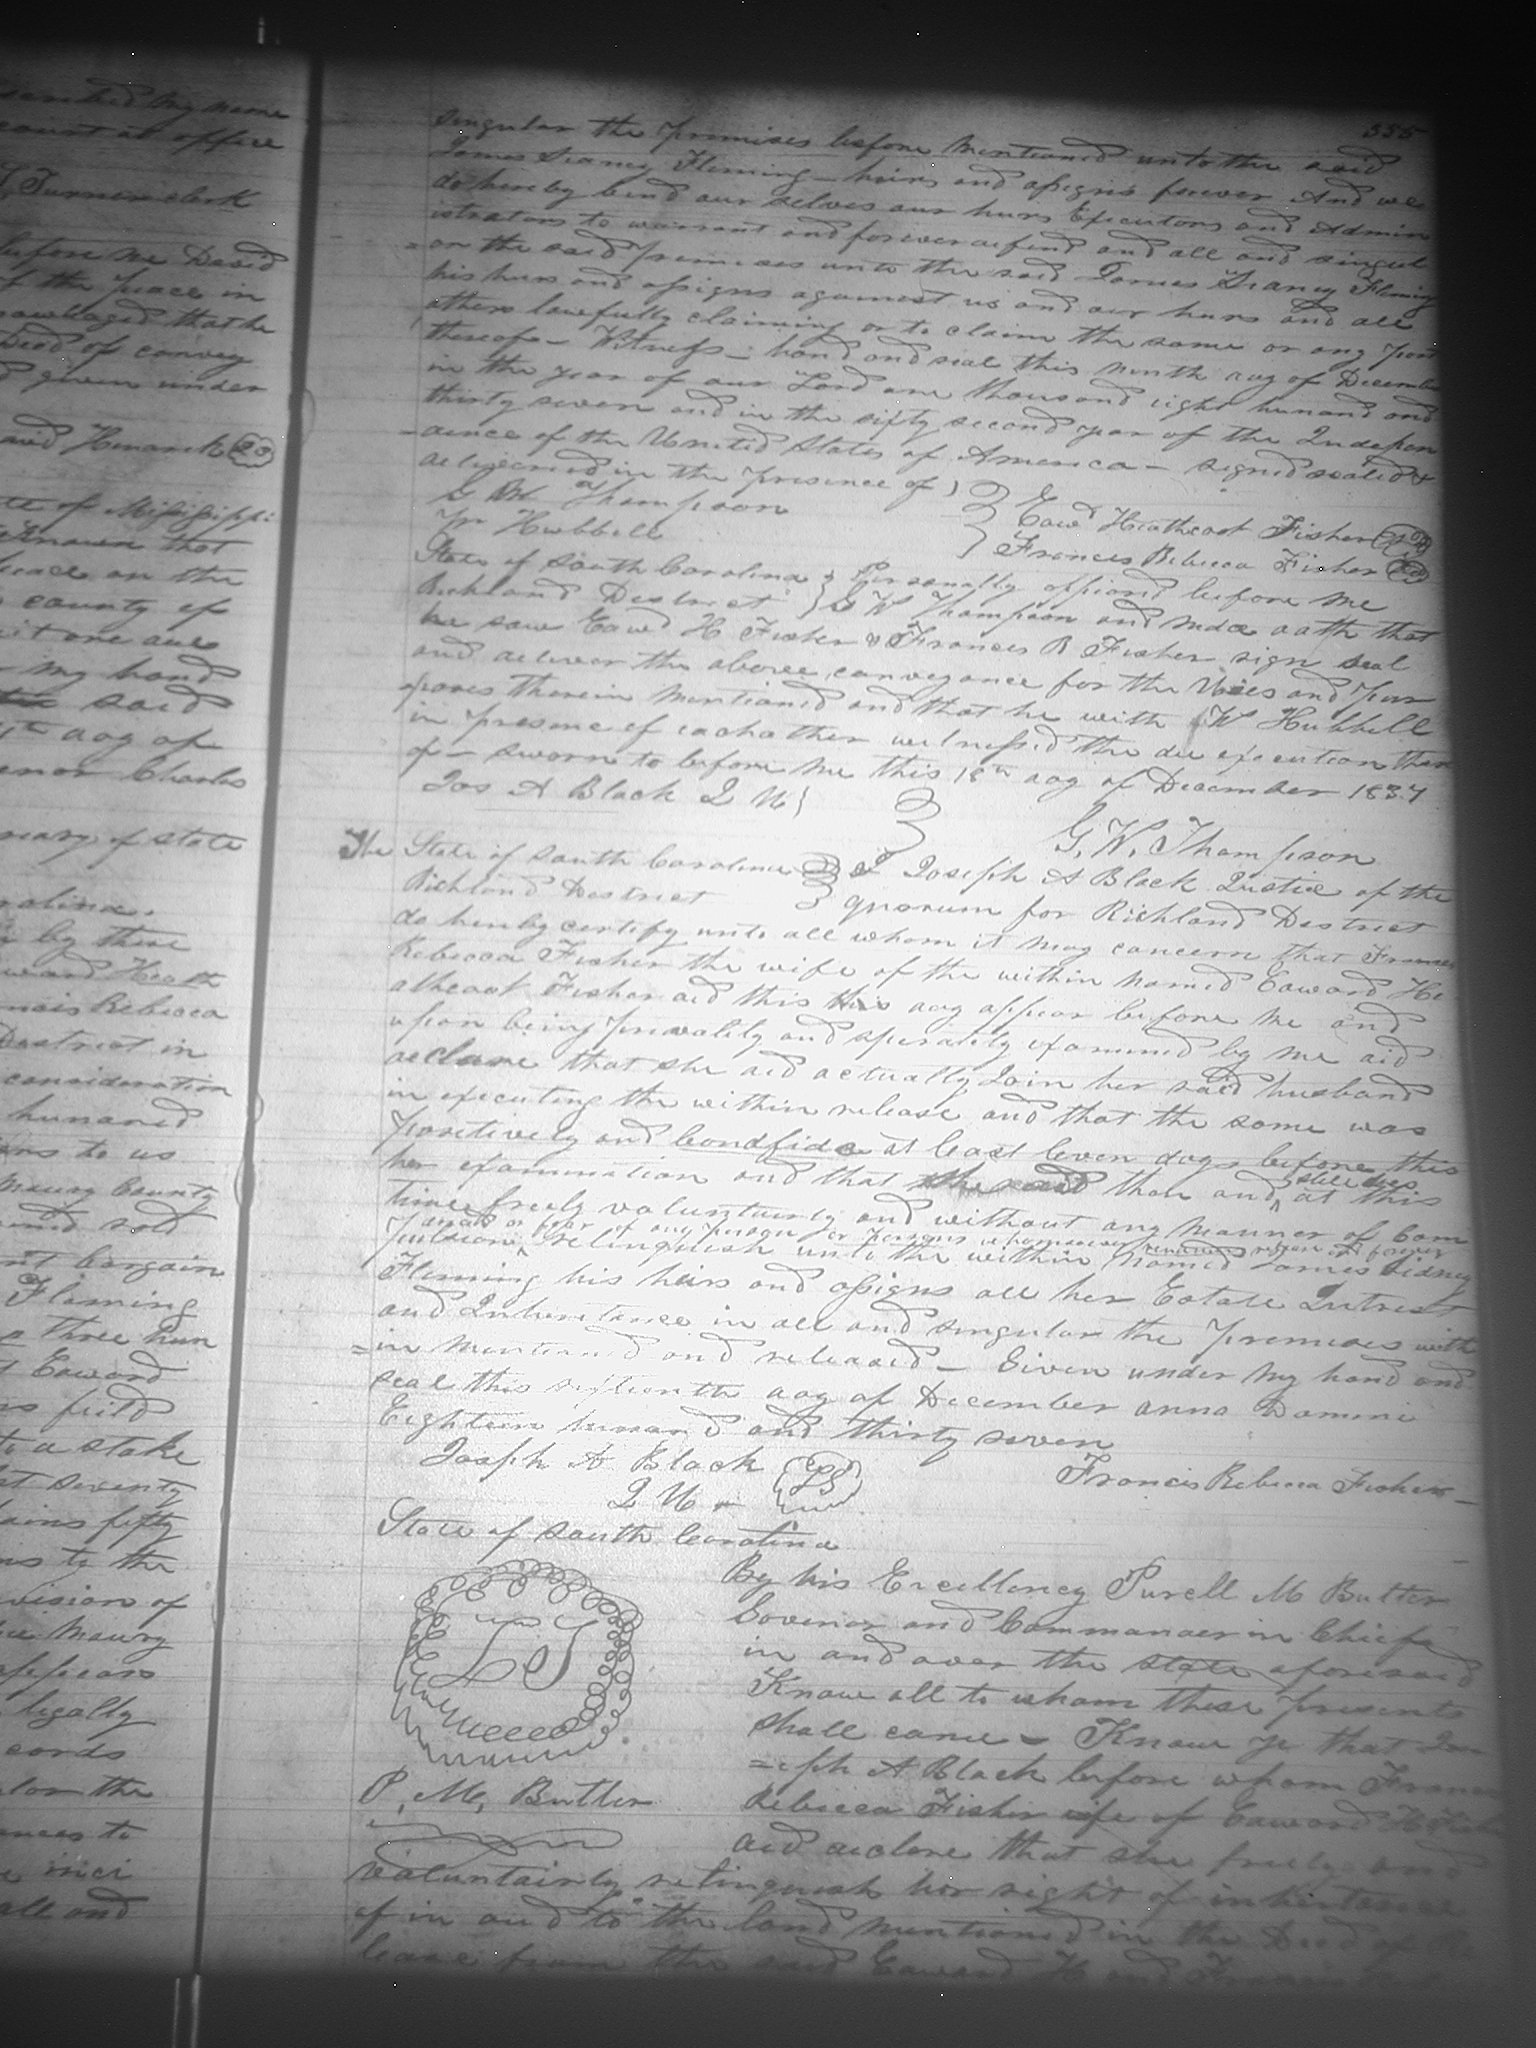
- Rotate the image until it is upright if necessary. Figure 4
above showed an example of a raw image from a camera while Figure
5 below shows the same image rotated left 90° to make it upright.
-
The keystone effect (that is, the image appears to recede from bottom to top of the page) that occurs because
the camera lens is not directly on top of the projection lens may be eliminated using the
features of most image editing programs such as Adobe Photoshop. In Photoshop,
the operation to remove the keystone effect is called perspective cropping.
Figure 6 shows the same images from
Figure 4 and Figure 5
after perspective cropping to correct the keystone effect.
- The contrast and brightness of the image may be adjusted or alternatively the levels represented in the image may be adjusted to achieve
better balance
easier reading. Figure 7 illustrates the same image as in the previous figures after level correction has been applied using Adobe Photoshop.
- Some areas of an image may be darker or lighter due to faded ink, side effects of the original filming of the
document, or the fact that less light was reflected to the camera near the
edges of the photograph when you filmed it. Using most image-editing programs, these effects can be removed by selectively choosing areas of the image and adjusting the contrast and/or brightness within those areas.
Figure 8 shows the same image after contrast adjustment in various areas of the image to
selectively improve its readability.
Click
on the thumbnail images above to see the full size picture
Home page of GSC Associates Historical
Record Products
Home page of GSC Associates
